[VPS]CentOS7.2の初期設定(3) -MariaDB/Apache編
以前のブログで書いた記事を再編集しました。(2018/01/09)
前回LAMP環境をひとまず整える所まできたと思いますが、今回はApacheはバーチャルドメインの方法とMariaDBの初期設定をしていきたいと思います。
設定環境
ローカル: Mac/OS: Mac Sierra
VPS: ConoHa VPS
OS: CentOS Linux release 7.2.1511 (Core)
作業用ユーザ名: devuser
MariaDBの最新バージョンへのアップデート
一応、MariaDBのバージョンをアップデートが可能なので方法を載せておきます。
必ず上げる必要はないので、したい方は参考にしてみてください。
アップデートの方法はMariaDBの公式サイトに書かれているものです。
https://mariadb.com/kb/en/mariadb/yum/#after-installation
全文コピーしてペーストして完了です。
$ sudo vi /etc/yum.repos.d/MariaDB.repo

[mariadb]
name = MariaDB
baseurl = http://yum.mariadb.org/10.1/centos7-amd64
gpgkey=https://yum.mariadb.org/RPM-GPG-KEY-MariaDB
gpgcheck=1
アップデートする前に、MariaDBを止めておきましょう。 そして、アップデート。
$ systemctl stop mariadb.service
$ sudo yum -y update
MariaDBを停止せずにアップデートした場合
私は、MariaDBを動かしたままアップデートしてしまったようでプロセスは生きたまま動いてなかったです。
$ systemctl list-units | grep mariadb
● mariadb.service loaded failed failed MariaDB database server
プロセスを止めてやる必要があり色々調べた結果、解決策は以下の方法になりました。
MariaDBのPIDを調べ、そのPIDに対し kill コマンドでプロセスを停止させる。
$ ps -ef | grep mariadb
mysql 9307 9150 0 Nov12 ? 00:00:55 -省略-
サービス名の後の番号、9307がPIDの場所なので、ここにkillコマンドを送ってあげます。 -SIGTERMオプションが終了シグナルを送信と書いていましたが、正直よくわかってないです。。 今回の場合は、単純に kill PID番号 でも問題なかったかもしれません。
Linuxコマンド集 – 【 kill 】 プロセスおよびジョブを強制終了する:ITpro
$ sudo kill -SIGTERM 9307これで、プロセスが終了していたので、MariaDBを起動します。
$ sudo systemctl start mariadb.service
$ mysql -V
mysql  Ver 15.1 Distrib 10.1.29-MariaDB, for Linux (x86_64) using readline 5.1
無事にMariaDBの10.x系にアップデート出来ました。
以下のサイトを参考にしました。
CentOS 7 MariaDB インストール、及び初期設定 – eTuts+ Server Tutorial
MariaDBのインストールと初期設定 | CentOS 7 – ex1-lab
MariaDBの初期設定
まずは、データベースの設定から。
MariaDBのデフォルト設定ファイルは /etc/my.cnf になっているようです。
$ less /etc/my.cnf
[mysqld]
datadir=/var/lib/mysql
socket=/var/lib/mysql/mysql.sock
# Disabling symbolic-links is recommended to prevent assorted security risks
symbolic-links=0
# Settings user and group are ignored when systemd is used.
# If you need to run mysqld under a different user or group,
# customize your systemd unit file for mariadb according to the
# instructions in http://fedoraproject.org/wiki/Systemd

[mysqld_safe]
log-error=/var/log/mariadb/mariadb.log
pid-file=/var/run/mariadb/mariadb.pid

#
# include all files from the config directory
#
!includedir /etc/my.cnf.d
最終行の /etc/my.cnf.d 以下を読み込んでいるようです。
ちなみに、MariaDBのバージョンを上げた方は以下のような感じです。
$ less /etc/my.cnf
#
# This group is read both both by the client and the server
# use it for options that affect everything
#
[client-server]

#
# include all files from the config directory
#
!includedir /etc/my.cnf.d
/etc/my.cnf.d には以下のファイルがありました。
$ ls /etc/my.cnf.d/
client.cnf mysql-clients.cnf server.cnf設定していくのは、server.cnf のファイルです。
MariaDBには各種設定のテンプレートがデータベースの規模に応じて用意されています。
/usr/share/mysql/ の中にある、my-xxx.cnf が対象のファイルです。
今回は最小の my-small.cnf で構築してみます。まずはテンプレートをユーザ設定ファイルへ上書きします。
$ sudo cp -p /usr/share/mysql/my-small.cnf /etc/my.cnf.d/server.cnfコピーしたら、文字コードの設定をutf-8に変更します。 クライアントとmysqldでプロパティ名(?) が違うので、気を付けましょう。
$ sudo vi /etc/my.cnf.d/server.cnf追加した辺りの記述です。
# The following options will be passed to all MySQL clients
[client]
#password = your_password
port = 3306
socket = /var/lib/mysql/mysql.sock
// 以下を追加
default-character-set = utf8

# The MySQL server
[mysqld]
port = 3306
---省略---
thread_stack = 240K
// 以下を追加
character-set-server = utf8
default_password_lifetime = 0
datadir = /var/lib/mysql
datadir でデータベースの保存先を明示しておきます。
MariaDBをインストールした時点で /var/lib/mysql は作成されていました。
もし無かった場合はディレクトリを作成してください。
MariaDBのセキュリティ設定
初期設定が終わったので、rootのパスワードやアノニマスユーザ削除などを行なっていきます。
mysql_secure_installation という便利なものがあるそうで、対話式(yes/no)で答えて行くようです!
$ sudo mysql_secure_installation

/bin/mysql_secure_installation: line 379: find_mysql_client: command not found

NOTE: RUNNING ALL PARTS OF THIS SCRIPT IS RECOMMENDED FOR ALL MariaDB
SERVERS IN PRODUCTION USE! PLEASE READ EACH STEP CAREFULLY!

In order to log into MariaDB to secure it, we'll need the current
password for the root user. If you've just installed MariaDB, and
you haven't set the root password yet, the password will be blank,
so you should just press enter here.

Enter current password for root (enter for none): // 空なので、エンターキー
OK, successfully used password, moving on...

Setting the root password ensures that nobody can log into the MariaDB
root user without the proper authorisation.

Set root password? [Y/n] // Yでパスワード設定
New password: // パスワードを入力
Re-enter new password: // もう一度パスワードを入力
Password updated successfully!
Reloading privilege tables..
... Success!
By default, a MariaDB installation has an anonymous user, allowing anyone
to log into MariaDB without having to have a user account created for
them. This is intended only for testing, and to make the installation
go a bit smoother. You should remove them before moving into a
production environment.

Remove anonymous users? [Y/n] // アノニマスユーザを削除しますか? ここはYで削除します
... Success!

Normally, root should only be allowed to connect from 'localhost'. This
ensures that someone cannot guess at the root password from the network.

Disallow root login remotely? [Y/n] // rootへのリモートログインをブロックしますか ここもYでブロックします
... Success!

By default, MariaDB comes with a database named 'test' that anyone can
access. This is also intended only for testing, and should be removed
before moving into a production environment.

Remove test database and access to it? [Y/n] // test用データベースを削除しますか ここもYで削除します
- Dropping test database...
... Success!
- Removing privileges on test database...
... Success!

Reloading the privilege tables will ensure that all changes made so far
will take effect immediately.

Reload privilege tables now? [Y/n] // 権限のリロードをしますか? Yで権限のリロードを行います
... Success!

Cleaning up...

All done! If you've completed all of the above steps, your MariaDB
installation should now be secure.

Thanks for using MariaDB!
とりあえず、これで初期設定は終了したので、ログインの確認を行います。
$ mysql -u root -p
Enter password: // 先ほど設定したパスワードを入力
Welcome to the MariaDB monitor. Commands end with ; or \g.
Your MariaDB connection id is 10
Server version: 5.5.50-MariaDB MariaDB Server

Copyright (c) 2000, 2016, Oracle, MariaDB Corporation Ab and others.

Type 'help;' or '\h' for help. Type '\c' to clear the current input statement.

MariaDB [(none)]>
MariaDB [(none)]> show databases;
+--------------------+
| Database           |
+--------------------+
| information_schema |
| mysql              |
| performance_schema |
+--------------------+
3 rows in set (0.00 sec)

MariaDB [(none)]> exit
Bye
これでMariaDBの初期設定は完了しました!基本的にMySQLの時を同じコマンドで操作が可能です。
Apacheの初期設定
今回は私がドメインを2つ持っている事とサブドメインでもいくつか作成していた為、 Apacheはバーチャルドメインの設定をし、別ドメインやサブドメインでも使えるようにします。
SFTP専用ユーザの作成
SFTPユーザを作成しない方は、下記にバーチャルドメインの設定がありますので、
ここは飛ばしてバーチャルホストの設定の部分から初めてください。
FTPクライアント等を使えるようにSFTP専用ユーザを作成します。
今回は例として sfuser とします。
作業用ユーザを作成した時と同じように、ユーザの追加とパスワードの設定を行います。
$ sudo useradd sfuser
$ sudo passwd sfuser
sftp専用グループを作成 グループ名の例としてsftp_usersとします。
$ sudo groupadd sftp_users
$ sudo usermod -G sftp_users sfuser
suコマンドでsftpユーザに変更
$ su sfuser
$ cd
$ pwd
/home/sfuser
sftpユーザに切り替えた後、cdコマンドでホームに移動します SSHは前回作ったものを再利用します。 (本当は別の鍵を作った方がセキュリティ的にはいいはずですが、一人で運用するので今回はパスします)
$ mkdir .ssh
$ chmod 700 .ssh
$ mkdir /home/sfuser/public_html
$ chmod 701 /home/sfuser/public_html/
$ chmod +x /home/sfuser/
public_html ディレクトリを作成し、他のユーザが変更出来ないようにパーミッションの変更及びApacheが読み込めるようにホームディレクトリ以下に実行許可を設定します。
私は public_html 以下にそれぞれドメイン名のディレクトリを作成して管理しています。
$ ls public_html/
emiac-works.com v000-000-000-000.ccc.static.cnode.io
$ exit
ひとまずこれで、ここでの設定は終わりなので、作業用ユーザに切り替えます。 作業用ユーザに切り替えた後、authorized_keysをsftpユーザにコピーし、ファイルのパーミッションを変更します
$ sudo cp /home/devuser/.ssh/authorized_keys /home/sfuser/.ssh
$ sudo chown sfuser:sfuser /home/sfuser/.ssh/authorized_keys
sshの設定ファイルの変更
$ sudo vi /etc/ssh/sshd_config

# override default of no subsystems
#Subsystem sftp /usr/libexec/openssh/sftp-server
Subsystem sftp internal-sftp

# Example of overriding settings on a per-user basis
Match Group sftp_users
X11Forwarding no
AllowTcpForwarding no
PermitTTY no
ForceCommand internal-sftp
sftp_usersグループに対し、sftpで動作するように設定します。 ssh設定の再読み込みをしてログアウトします。
$ systemctl restart sshd
$ exit
logout
Connection to xxx.xxx.xxx.xxx closed.
ここで、一度ローカル側で作業を行います。 ローカル側でsftpでアクセスして、作業用ユーザ、もしくは他のユーザのディレクトリにアクセス出来ない事をとりあえず確認します。
$ sftp -P 59876 [email protected]
// rsaキーの名前を変更している場合は -i オプションを付けます。
$ sftp -P 59876 -i /path/to/rsaキー名 [email protected]
Connected to xxx.xxx.xxx.xxx.
sftp> ls
sfuser devuser
sftp> ls devuser
remote readdir("/devuser/"): Permission denied
sftp> exit
これで、Transmit や CyberduckなどのFTPクライアントでSFTPが使用できると思います。 設定する際は、SFTP通信,秘密鍵の指定を忘れずに! また、独自ドメイン内にテスト用htmlファイルを入れておくと、後ほどチェックの際に良いかもしれません。
Apacheでホームディレクトリが使用できるように変更 sftpユーザを作成した場合もう少しApacheに変更を加える必要があります。 Apacheがsftpユーザのホームディレクトリを使用できるようにしなければなりません。
$ sudo vi /etc/httpd/conf.d/userdir.conf

#
# UserDir: The name of the directory that is appended onto a user's home
# directory if a ~user request is received.
#
# The path to the end user account 'public_html' directory must be
# accessible to the webserver userid. This usually means that ~userid
# must have permissions of 711, ~userid/public_html must have permissions
# of 755, and documents contained therein must be world-readable.
# Otherwise, the client will only receive a "403 Forbidden" message.
#
<IfModule mod_userdir.c>
#
# UserDir is disabled by default since it can confirm the presence
# of a username on the system (depending on home directory
# permissions).
#
#UserDir disabled
// 以下に書き換え
UserDir enabled sfuser

#
# To enable requests to /~user/ to serve the user's public_html
# directory, remove the "UserDir disabled" line above, and uncomment
# the following line instead:
#
#UserDir public_html
// #を外す
UserDir public_html
</IfModule>

#
# Control access to UserDir directories. The following is an example
# for a site where these directories are restricted to read-only.
#
<Directory "/home/*/public_html">
#AllowOverride FileInfo AuthConfig Limit Indexes
AllowOverride All
Options MultiViews Indexes SymLinksIfOwnerMatch IncludesNoExec
#Require method GET POST OPTIONS
Require method GET POST
</Directory>
これでsftpユーザのホームディレクトリが使用できるようになりました。 次にバーチャルホストの設定を行なって行きます。
バーチャルホストの設定
いよいよバーチャルホストの設定をしていきます、/etc/httpd/conf.d/ 内に新規ファイルとして、
仮に vhost.conf を作成します。
私はドメイン名.conf という感じで管理しています。
またユーザディレクトリで管理しない場合は、
DocumentRoot(ドキュメントルート)の部分をファイルを置くパスに変更してください。
$ sudo vi /etc/httpd/conf.d/vhost.conf

<VirtualHost *:80>
ServerName example.com
DocumentRoot /home/sfuser/public_html/example.com
ServerAdmin postmaster@localhost
ErrorLog /var/www/example.com/logs/error_log
CustomLog /var/www/example.com/logs/access_log combined
</VirtualHost>

#
# サブドメイン(sub.example.com)
# ドメイン毎に記述する必要があります
#

<VirtualHost *:80>
ServerName sub.example.com
DocumentRoot /home/sfuser/public_html/sub.example.com
ServerAdmin postmaster@localhost
ErrorLog /var/www/sub.example.com/logs/error_log
CustomLog /var/www/sub.example.com/logs/access_log combined
</VirtualHost>Apacheで設定ファイルを何か書き換えた場合は、apachectl configtest と言うコマンドで問題がないかチェックしてくれます。
バーチャルホストを設定した場合は
$ apachectl configtest
AH00558: httpd: Could not reliably determine the server's fully qualified domain name, using fe80::1:85ff:fe82:626b. Set the 'ServerName' directive globally to suppress this message
ServerNameの部分を設定しろと書かれているので設定してあげます。
$ sudo vi /etc/httpd/conf/httpd.conf

-省略-
#
# ServerName gives the name and port that the server uses to identify itself.
# This can often be determined automatically, but we recommend you specify
# it explicitly to prevent problems during startup.
#
# If your host doesn't have a registered DNS name, enter its IP address here.
#
#ServerName www.example.com:80
ServerName localhost:80

--省略--
ServerNameの部分をlocalhostに設定しました。
apachectl コマンドを実行して問題がないかチェックします。
またrootで apachectl コマンドを実行しない場合、ログのパスへアクセス出来ずエラーが出る場合があります。
エラーが出る場合はrootで一度実行してみてください。
最後にhttpdを再起動して新しい設定を適用させます。
$ apachectl configtest
Syntax OK
$ systemctl restart httpd
これでバーチャルホストの設定は終了です。
DNSの設定を行う
このままだとDNSの設定を行なっていないかと思います。私はvalue-domainでドメインを取得していましたので操作方法は異なるかと思われます。また お名前.comだとConoHaと連携は簡単そうでした。ですが、流れとしては
- ドメインに設定しているものを外す
- ネームサーバをConoHaのものに変える
- ConoHaのコントロールパネルでIPとドメインを紐づける
一つ目のドメインに設定しているものですが、value-domainの場合だとダイナミックドメインの設定や、レコードの設定等を行なっていました。その辺りを全て無効や、書き込んでいたものを全て消しました。二つ目はネームサーバの変更ですが、ConoHaのネームサーバを見つけるのに苦労しましたので以下に記載しておきます。
- ns-a1.conoha.io
- ns-a2.conoha.io
- ns-a3.conoha.io
ドメインホスティング情報表示 – DNS API v1.0 / ConoHa API
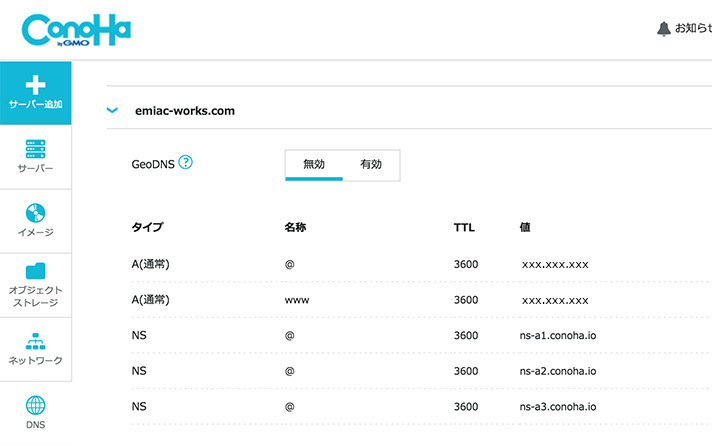
三つ目はConoHaのコントロールパネルから「DNS」を選択し、+ドメインの部分をクリックしてドメインを追加します。 追加した後GeoDNSは無効のまま、保存します。 保存した後、ドメインを選択し右側にある鉛筆マークから編集を行います。 値の部分はVPSのIPアドレスを記入してください。
サブドメインについてはタイプの選択でCNAMEを使って指定するか、今後、Let’s Encryptを使ってHTTPS化する場合はタイプA(レコード)で一つづつサブドメインを作成した方がいいかもしれません。
またDNSを設定した後は最大で72時間程、切り替わるまでかかるかもしれません。私の場合は20分程で切り替わってました。
ネットに公開されているツールを使用して確認してました。
DNSも色々と奥が深いです。
参考サイトの欄にDNS関連のものがあるので是非、読んでみてください。 以上の設定が完了したら、http://example.com でアクセス出来るかと思います。 アクセスが確認できたら、Apacheをもう少し設定してあげます。
最低限のApacheのセキュリティ設定
私が行なった最低限チェックしないといけなさそうな部分を設定して行きます。 welcomeページのリネームとオートインデックスのリネーム 独自ドメインやConoHaのドメインでアクセスが確認出来れば、welcomeページを読み込まないようにします。 以下のコマンドはファイルのリネームをしています。 現在の設定では、.confが付くファイルを読み込むようになっています。
$ sudo mv /etc/httpd/conf.d/welcome.conf /etc/httpd/conf.d/welcome.conf.org
$ sudo mv /etc/httpd/conf.d/autoindex.conf /etc/httpd/conf.d/autoindex.conf.org
いくつかのセキュリティを高める項目を追加するために新規ファイルを作成します。
$ sudo vi /etc/httpd/conf.d/security.conf

ServerTokens Prod
TraceEnable Off
Header unset X-Powered-By
Header append X-Frame-Options SAMEORIGIN
Header set X-XSS-Protection "1; mode=block";
Header set X-Content-Type-Options nosniff
RequestHeader unset Proxy

<Directory /home/sfuser/public_html>
 AllowOverride All
 Options -Indexes
 <IfVersion < 2.3>
   ServerSignature Off
   FileETag MTime Size
 </IfVersion>
</Directory>

<Directory "/var/www/cgi-bin">
 <IfVersion < 2.3>
   ServerSignature Off
   FileETag MTime Size
 </IfVersion>
</Directory>
以下のページを参考にしました。各項目の詳しい説明が記載されているので、 是非読んでください。
この辺りで一通りの設定が出来たかと思います。
ConoHaの場合だと、スナップショットという機能がありいわゆるバックアップです。
サーバを本格起動させる前に一度スナップショットを取っておく事を強くおすすめします。何故なら、スナップショットを取る際は一度VPS自体をシャットダウンした状態でしかスナップショットが取れません。
次回はいよいよ初期設定の最終回、MariaDBのデータベースとユーザの作成からWordPress公開までを行います。
参考サイト
chrootされたsftp専用ユーザを作るメモ – Qiita
Centos7(apache2.4)のバーチャルホスト(virtual host)の設定 | システムエンジニアの徒然日記